Introduction
Windows 11 at the time of writing this post is currently launched as an insider preview. On the announcement of Windows 11, Microsoft did state that there are a number of minimum requirements that need to be met to run Windows 11. In this quick guide, I will show you how to configure a Virtual Machine within VMware Workstation for running Windows 11 VMs.
Getting started
There are three parts to configuring a VMware Workstation VM for Windows 11:
- Configure VM Encryption
- Add the Virtual Trusted Platform Module to the VM Hardware
- Enable Secure Boot
Step 1 configure VM Encryption
In this section we look at enabling VM Encryption for the VMware Workstation VM.
Within the Virtual Machine settings page, select the options tab. You should then see the Access Control setting located halfway down the list of settings. Select Access Control.
Summary steps:
Virtual Machine Hardware Settings > Options > Access Control > Encrypt
Click the Encrypt button as shown in the screenshot below

The Encrypt Virtual Machine Dialog will then appear for you to provide a password. (follow the guidance provided in he dialog box).

Once you have entered a password and clicked encrypt, you will see the progress bar appear whilst the encryption process completes.

Once Encryption has completed, you will see the access control setting form has change. It should now show “This virtual machine is encrypted”

There you have it step 1 is now complete, Lets move on to step 2 where we add the TPM chip.
Step 2 Add the Trusted Platform Module
In this section we look at adding the TPM chip to the Virtual Machine hardware.
Within the Virtual Machine Settings page, under the Hardware Tab, click add (1), then select the Trusted platform Module (2) and then Click finish (3).
Virtual Machine Settings > Hardware > Add > Trusted Platform Module > Finish

Once added, you should see the Trusted Platform Chip (TPM) showing as present.

Now that we have added the Trusted platform chip, we can now progress with enabling Secure Boot.
Step 3 enable Secure Boot
In this section we check to ensure secure boot is enabled on the VM.
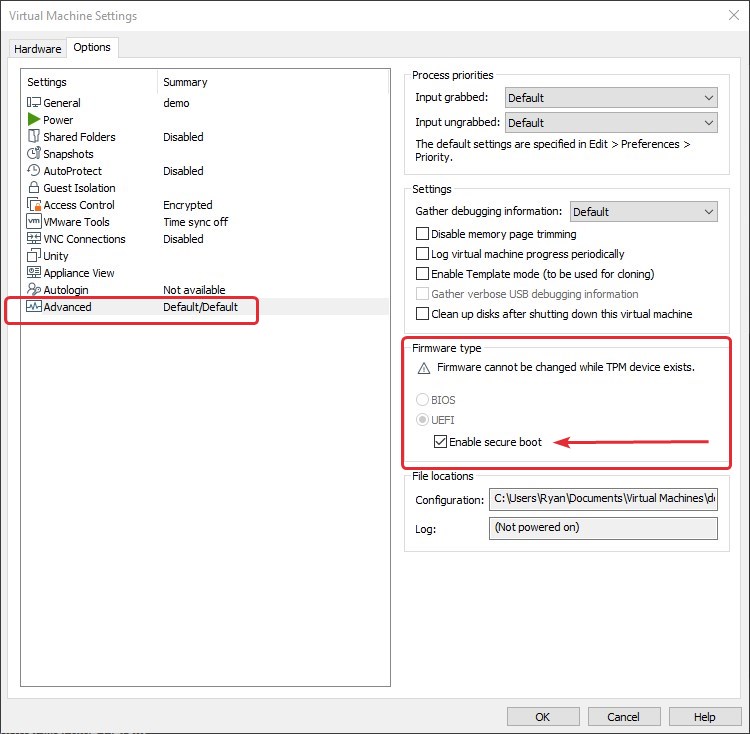
Within the Same Virtual Machines Settings, navigate back to options and select the Advanced settings. You will then See the Firmware Type. Make sure you have UEFI selected and then ensure that “Enable secure boot” is enabled.
Virtual Machine Settings > Options > Advanced > Firmware Type > UEFI > Enable secure boot

Once these steps have been completed, you are now ready to run Windows 11 Virtual Machines on VMware Workstation.
you can also check that you have configured everything correctly with a free tool I wrote for checking a device’s minimum requirements for Windows 11. You can download from the following Link: https://github.com/RMITBLOG/Win11Compat/releases/tag/1.2

Summary:
In this quick start guide, I showed you how to configure VMware workstation for Windows 11. I walked you through the three steps of enabling device encryption, adding the trusted platform module as well as enabling secure boot.
Remember to make sure you add 2 CPU’s and 4GB initially as these are also Windows 11 minimum requirements.

Links:
Upgrade to the New Windows 11 OS
Update on Windows 11 minimum system requirements | Windows Insider Blog


Thank you, It works for me!